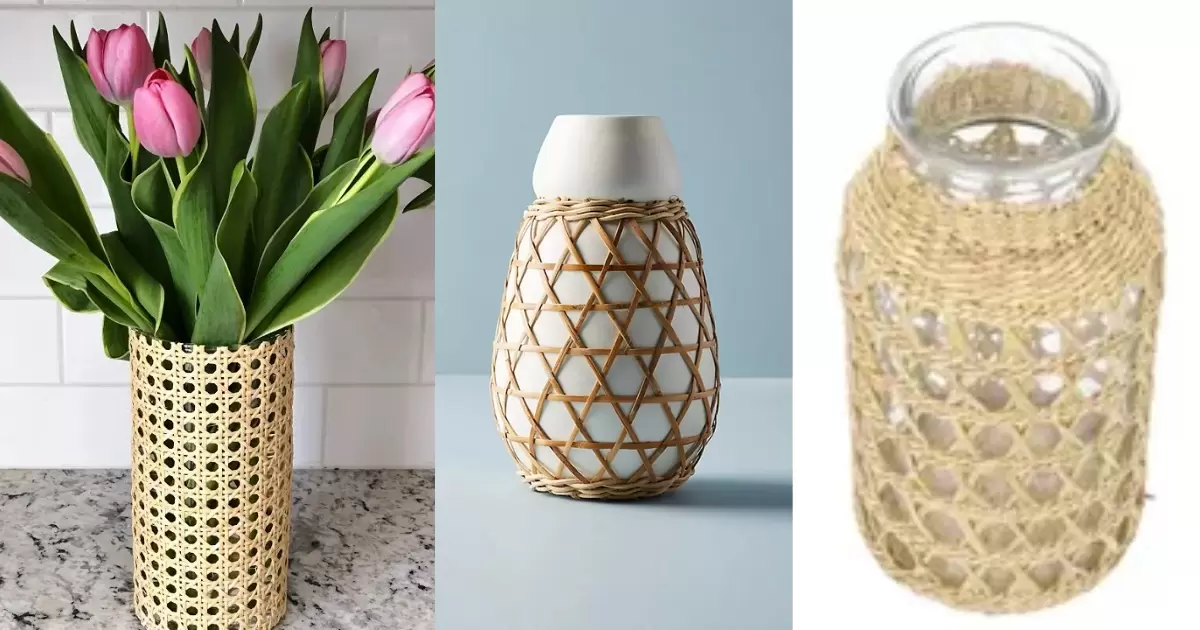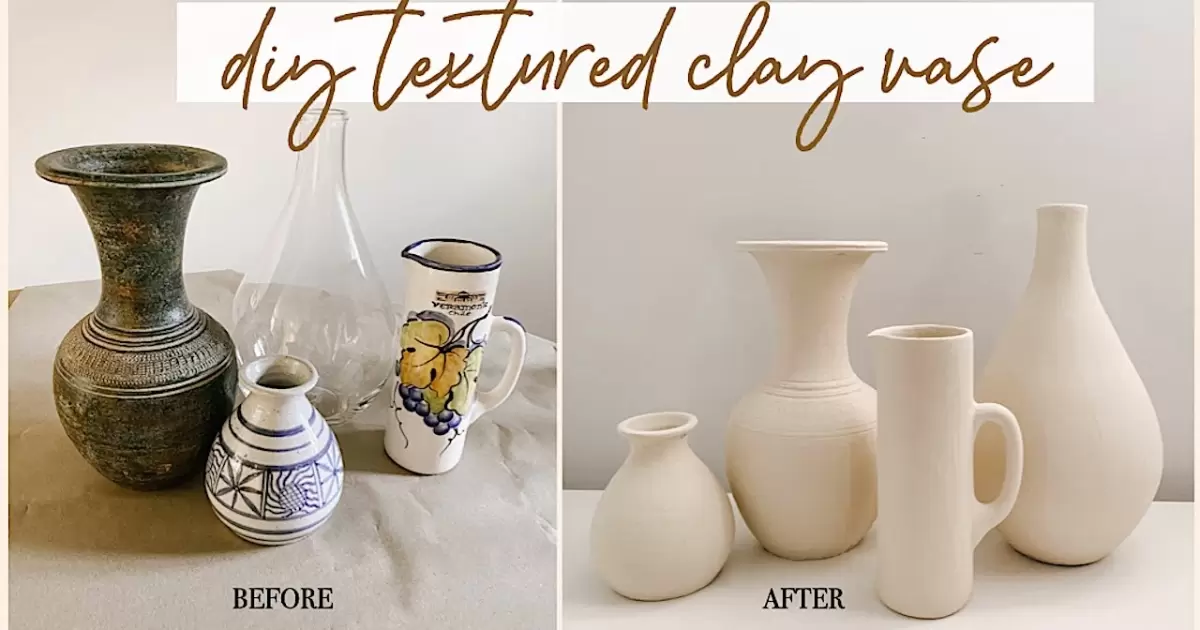
A DIY Textured Vase inspired by Pottery Barn is a project where you transform a plain vase into a stylish piece. You can use materials like textured paint, sandpaper, and stencils to create a pottery-inspired look. It's a fun way to add personality to your home decor and unleash your creativity. Plus, it's budget-friendly and allows you to customize your vase to match your style perfectly.
Transform your space with a touch of creativity! Dive into the world of home decor with a DIY textured vase inspired by Pottery Barn. Unleash your artistic flair as you craft a stunning masterpiece that adds character to any room.
With just a few simple materials and a dash of imagination, you can elevate your decor while expressing your unique style. With step-by-step guidance and helpful tips, you'll discover how to transform ordinary vases into extraordinary pieces of art. Turn your home into a haven of style and personality with this simple yet rewarding project.
Materials and Tools
Let's gather the essentials for your DIY textured vase project. You'll need a plain vase as your starting point. Any size or shape works well. For the textured effect, grab some textured paint in your preferred colors.
With these simple materials and tools, such as a paintbrush or sponge for applying the textured paint smoothly and stencils for adding intricate patterns or designs, you're all set to embark on your creative journey and transform your vase into a stunning piece inspired by Pottery Barn. Consider exploring a DIY fall home decor diy textured vase to infuse seasonal charm into your decor.
Inspiration and Design

Let's delve into the inspiration behind your DIY textured vase project. Drawing from Pottery Barn's timeless designs, aim for a rustic yet elegant aesthetic. Consider incorporating earthy tones and natural textures to mimic the charm of artisan pottery.
When designing your vase, think about the overall ambiance you want to create in your space. Whether you prefer a modern farmhouse feel or a more traditional look, let your imagination guide you. With a clear vision and a touch of creativity, you'll craft a textured vase that adds character and sophistication to any room in your home.
Selecting Textured Materials
When choosing textured materials for your DIY textured Vase, opt for ones that will add dimension and interest to your design. Consider using textured paint in various colors to create depth and visual appeal.
Experiment with materials like sand, fabric, or even dried flowers to add tactile elements to your vase. These textured materials will not only enhance the visual aesthetics but also provide a tactile experience when touched.
Applying Texture
Now it's time to apply texture to your DIY Textured Vase. Begin by selecting your preferred method, whether it's stippling, sponging, or using textured paint directly. Use a brush or sponge to apply the texture evenly across the surface of the vase. Experiment with different techniques and layering to achieve the desired effect, adding depth and interest to your design.
Take your time and work in small sections, ensuring thorough coverage and consistency throughout. Don't be afraid to get creative and try out different patterns or textures to make your vase truly unique. Once you're satisfied with the texture, allow the paint to dry completely before moving on to any additional embellishments or finishing touches. With careful application, your DIY Textured Vase will become a standout piece in your home decor collection.
Drying Time
After applying texture to your DIY Textured Vase, patience is key as you wait for it to dry thoroughly. Allow the vase to air dry in a well-ventilated area, ensuring proper circulation. Depending on the type of textured paint used and the thickness of application, drying times may vary. It's essential to wait until the paint is completely dry to the touch before handling or moving the vase.
Avoid rushing the drying process to prevent smudges or imperfections in your textured design. Take this time to admire your work and envision how it will enhance your home decor. Once fully dried, your DIY Textured Vase will be ready to display proudly, showcasing your creativity and attention to detail.
Painting

Now comes the fun part: painting your DIY Textured Vase. Use a brush or sponge to apply your chosen paint color evenly across the textured surface. Work in small sections to ensure thorough coverage and consistency in your application. Experiment with layering and blending to achieve the desired depth and richness of color.
Take your time and enjoy the process of bringing your textured vase to life with vibrant hues. Allow the paint to dry completely between coats to avoid smudging or unevenness. Once you're satisfied with the color and coverage, step back and admire your handiwork
Adding Details
Now it's time to add those final touches to your DIY Textured Vase. Consider embellishing your design with additional details such as stenciled patterns or decorative accents. Use a steady hand and precision to ensure clean lines and crisp edges. These small details can elevate your vase and make it truly unique.
Experiment with metallic paints or glitter for a touch of sparkle and shine. Alternatively, you can incorporate natural elements like twine or dried flowers for a rustic charm. Let your creativity flow as you personalize your textured vase to match your style and preferences.
Finishing Touches
As you near the completion of your DIY Textured Vase project, focus on the finishing touches. Ensure that all paint layers are completely dry before handling or displaying the vase. Once dry, inspect the vase for any imperfections or areas that may need touch-ups.
Consider sealing the painted surface with a clear varnish or sealant to protect the finish and enhance durability. This final step will also give your textured vase a professional-looking sheen. With these finishing touches, your DIY Textured Vase will be ready to take center stage in your home decor, showcasing your creativity and craftsmanship for all to admire.
Types of Diy Textured Vase Inspired By Pottery Barn
|
Type of DIY Textured Vase |
Description |
|
Textured Paint Vase |
Plain vase transformed with textured paint for a rustic look. |
|
Fabric-Wrapped Vase |
The vase is adorned with fabric strips for a tactile and cozy feel. |
|
Stenciled Pattern Vase |
The vase is decorated with stenciled patterns for a delicate design. |
|
Twine Wrapped Vase |
Vase embellished with twine for a natural and organic look. |
|
Metallic Accent Vase |
Vase adorned with metallic paints or accents for a touch of glam. |
Displaying Your Creation

Now that your DIY Textured Vase is complete, it's time to showcase your creation. Choose a prominent spot in your home where it can be admired and appreciated. Consider displaying it on a mantel, shelf, or as a centerpiece on a table.
Pair your textured vase with complementary decor items such as candles, greenery, or other decorative accents. This will help enhance its visual appeal and tie together the overall look of the space. With your textured vase proudly on display, you'll be able to enjoy the fruits of your creative labor and add a personal touch to your home decor.
Frequently Asked Question
How difficult is it to make a DIY Textured Vase inspired by Pottery Barn?
Crafting a DIY Textured Vase can vary in difficulty based on chosen techniques, but many methods are beginner-friendly.
What materials do I need for a DIY Textured Vase inspired by Pottery Barn?
Common materials include a plain vase, textured paint, sandpaper, brushes, stencils, and optional embellishments like twine or fabric.
Can I customize the design of my DIY Textured Vase?
Absolutely! You can experiment with different textures, colors, and patterns to achieve a look that suits your personal style and decor.
How long does it take to complete a DIY Textured Vase project?
The timeframe can vary depending on drying times and complexity, but most projects can be completed within a day or two.
Conclusion
In conclusion, crafting a DIY Textured Vase inspired by Pottery Barn is a rewarding endeavor. By following simple steps and utilizing basic materials, you can create a stunning decor piece. The project allows for personalization, reflecting your unique style and creativity.
From selecting materials to adding final touches, each step contributes to the vase's beauty. Displaying your creation proudly in your home adds charm and character. Embrace the process and enjoy the satisfaction of transforming a plain vase into a work of art.