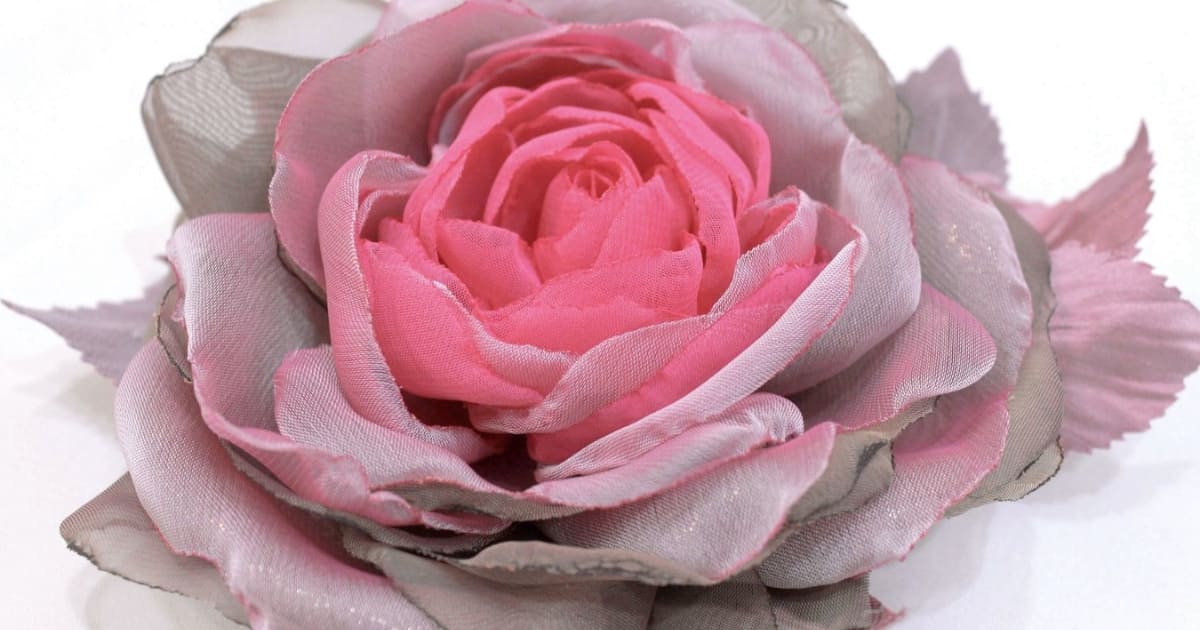
Making silk roses is simple. Start by cutting silk fabric into petals. Then, shape each petal using a heated tool. Assemble the petals, securing them with glue. Finally, add a stem and leaves. Now, you have beautiful silk roses!
Want to create stunning silk roses effortlessly? The secret lies in a simple and enjoyable process. Discover the art with our How to Make Silk Roses guide. Transform ordinary silk fabric into elegant floral masterpieces, step by step. Let your creativity bloom!
Each step in the guide seamlessly builds upon the last, ensuring a smooth and enjoyable creative process. The beauty of making silk roses lies not just in the final result but in the connection between your hands and the delicate fabric, bringing your floral vision to life effortlessly. Enjoy the journey of crafting with our step-by-step guide!
Gather Materials and Tools
First, gather the essential materials and tools to begin crafting your silk roses. You'll need silk fabric in your chosen colors, scissors for precise cutting, and a heated tool to shape the petals. Now, have a reliable glue on hand for assembling the floral components seamlessly.
Include wire for crafting sturdy stems and some green fabric to fashion lifelike leaves. Keep these basic materials within reach to ensure a smooth and enjoyable crafting experience as you progress through the steps of making beautiful silk roses.
Prepare Templates
Next in our step-by-step guide is preparing templates for the silk rose petals. Lay your silk fabric flat and use the scissors to cut petal shapes according to your desired size and style. These templates serve as the foundation for crafting each delicate petal.
Ensure precision in your cutting to achieve uniformity in your silk roses. This meticulous preparation sets the stage for the following steps, allowing you to focus on shaping and assembling the petals seamlessly. With your templates ready, you're one step closer to creating stunning silk roses with a personal touch. Explore the two ways to arrange roses for even more inspiration.
Cut Silk Fabric

With your templates in hand, it's time to cut the silk fabric. Lay the templates on the fabric, and carefully cut around them to create individual petals. Precision in cutting ensures uniformity, contributing to the overall beauty of your silk roses.
Take your time with this step, focusing on clean and accurate cuts. The cut silk petals will serve as the building blocks for your floral creation, shaping the elegance of each rose. As you complete this phase, you'll see the potential of your silk fabric transforming into a vibrant bouquet of handmade roses.
Shape Petals
Now that you have your silk petals, it's time to give them life and dimension by shaping them. Use a heated tool to gently mold each petal, adding realistic curves and texture. This step brings a touch of authenticity to your silk roses.
Pay attention to the details, as the subtle bends and twists in each petal contribute to the overall charm of the finished flower. The shaping process allows you to infuse your silk roses with a natural and lifelike appearance, making them stand out as unique and visually appealing creations.
Create the Rose Center

With the shaped petals ready, the next step is creating the center of your silk rose. Take a smaller silk fabric, crumple it gently, and form a tight bud. This central element will serve as the heart of your rose, providing a focal point for the entire flower.
Secure the crumpled fabric tightly, ensuring the rose center stays intact. As you add this central feature, you'll notice your silk rose to come to life, with each component working harmoniously to capture the essence of a natural bloom. This pivotal step brings a sense of completeness to your handmade silk roses.
Attach Petals
Now that you have the rose center in place, it's time to attach the shaped petals. Begin by applying a small amount of glue to the base of each petal, then carefully secure them around the rose center. Ensure a snug fit to create a cohesive and visually appealing silk rose.
Work methodically, adding one petal at a time and allowing the glue to set. The careful attachment of each petal brings depth and fullness to your silk rose, mimicking the layers of a natural blossom. With this step completed, your handmade silk rose is well on its way to becoming a beautiful and intricate floral creation.
Build the Rose
Building the silk rose involves layering the attached petals to achieve a natural and graceful appearance. As you add each petal, take a moment to arrange and overlap them artfully, creating a visually pleasing composition. This step allows you to shape the silk rose into a realistic and full-bodied flower.
Continue building the rose systematically, paying attention to the balance of petals and the overall symmetry. The layering process is crucial in achieving the desired volume and form, resulting in a handmade silk rose that captures the elegance of nature. With patience and precision, you'll witness your silk rose blossom into a stunning and unique creation.
Wrap Stems with Floral Tape

With the silk rose taking shape, the next step is wrapping the stems with floral tape. Start at the base of the petals and carefully wind the tape downward, securing the layers together. This step not only adds a finishing touch but also ensures the stems are sturdy and well-connected.
Work systematically, ensuring the floral tape is wrapped tightly for a secure hold. The wrapped stems not only contribute to the overall aesthetics of your silk rose but also provide stability, making it easier to arrange and display your handmade floral creation. As you complete this step, you'll have a beautifully crafted silk rose ready to be admired.
Add Leaves (Optional)
To enhance the realism of your silk rose, consider adding leaves as an optional step. Cut small pieces of green fabric to resemble leaves and secure them to the stem using glue. This simple addition provides a touch of authenticity to your handmade floral creation.
Place the leaves strategically along the stem, ensuring they complement the silk rose without overshadowing its beauty. Whether you choose to include leaves or not, this step allows for personalization, giving your silk rose a unique and natural appearance. With leaves added, your silk rose is now complete, ready to be showcased, and admired for its intricate craftsmanship.
Types of Silk Roses: A Step-By-Step Guide
|
Technique |
Materials |
Steps |
|
Ribbon Roses |
Silk ribbon, wire, scissors |
1. Cut ribbon. 2. Twist for petals. 3. Wrap with wire. |
|
Fabric Roses |
Silk fabric, wire, glue, scissors |
1. Cut fabric circles. 2. Glue layers. 3. Wrap wire. |
|
Crepe Paper Roses |
Crepe paper, wire, tape, scissors |
1. Cut paper shapes. 2. Tape onto wire. 3. Shape. |
|
Satin Ribbon Roses |
Satin ribbon, wire, glue, scissors |
1. Cut ribbon strips. 2. Glue layers. 3. Shape wire. |
|
Tissue Paper Roses |
Tissue paper, wire, glue, scissors |
1. Cut paper shapes. 2. Glue layers. 3. Shape wire. |
Fine-Tune and Display
With your silk rose complete, take a moment to fine-tune its details. Adjust the petals, ensuring they are evenly spaced and artfully arranged. This step allows you to perfect the overall appearance of your handmade creation.
Once satisfied with the arrangement, find a suitable vase or container to display your silk rose. Place it with care, allowing the beauty of your craftsmanship to shine. Whether as a decorative piece or a thoughtful gift, your meticulously crafted silk rose is now ready to grace any space with its timeless elegance.
Frequently Asked Question
How long does it take to make silk roses using the step-by-step guide?
The crafting time varies, but with practice, you can create one in an hour.
Are special tools required for making silk roses?
Basic tools like scissors, glue, and a heated tool are sufficient for this craft.
Can I personalize my silk roses with different colors and sizes?
Absolutely! The guide encourages creativity, allowing for diverse color and size choices.
Are silk roses suitable for gifting or just home decor?
Silk roses make perfect gifts! They add a personal touch to any occasion.
Conclusion
In conclusion, crafting silk roses is a rewarding artistic endeavor. Following the step-by-step guide ensures a seamless and enjoyable creative process. The tactile engagement in cutting, shaping, and assembling brings forth a beautiful handmade floral masterpiece.
As you progress through each stage, from preparing templates to fine-tuning details, the intricate layers come together harmoniously. The option to add leaves provides a personalized touch, enhancing the realism. Display your completed silk rose proudly, as it is a testament to your creativity and attention to detail.